Monday, 23 May 2011

A good lunch


First of all let me start off by saying YEAH WOHOOO GO CANUCKS!!!! IN YOUR FACE SHARKS!!!!
And now that that's out of my system I want to apologize for the less than stellar picture, but seeing as it's a French onion soup and grilled cheese for lunch on this lesson it's hard to have a pristine plate with the cheese melting to the bowl.

This lesson was to teach basic knife skills as well as recipe and cook times.

For the soup:
5 sliced large yellow onions
handful of thyme
2 bay leaves
3 litres of beef stock
2 cups of red wine

for the top:
slices of bread
grated smoked Guyere cheese

The first thing you need to do is put your oven on too preheat at 400 and move one rack to the second last placement. While the oven is heating up put all your sliced onions into deep pot heated to medium with oil. Sweat your onions off until they are soft and pliable then turn it up to a higher temperature so you can caramelize them properly, the best is a golden-dark brown. Now is a good time to throw in your thyme and bay leaves. Stir in your aromatics for at least 5 minutes before you pour in your wine. Let the wine reduce by half then pour in all your beef stock and season to taste then let simmer for about 1/2 an hour stirring every 3-5 minutes.

With the bread you'll be making croutons so cut the bead to fit into the top of your bowl then place on a cooking sheet and sprinkle olive oil and salt on them. Place in the oven until dry and slightly golden brown. After you remove them from the oven turn it onto broil so you can melt your cheese.

Now that you have everything ready make your grilled cheese !! I personally use Applewood smoked cheddar. Make this about 5 minutes before the soup is read to come out of the pot and just lightly colour both sides of the grilled cheese then place on the bottom rack of the oven. 

What you should do now is ladle your soup out into bowls according to your preferred portion size, place a crouton on top each one and then cover with a generous amount of Guyere cheese then place in the oven on the top rack while it's on broil too melt the cheese, them take it out as soon as it's fully melted but use a dry towel as the bowl with be very hot.

Right as your placing the soup/s/ in the oven you should be taking out your grilled cheese.Cut your grilled cheese and place on the plate, then put the soup on the plate after it comes out as well and enjoy !!!!!!

I love french onion soup so much because it's such a traditional thing, so simple and beautiful also such classic that I cant help but enjoy !!! Actually I think I'm going to make some more right now, so this is your chef saying have a good one !! and wishing you all great food !

Friday, 20 May 2011

scallops


Jumbo Baja scallops with blackberry compote, cannellini bean purée, crushed candied wasabi peas
fried leeks and a single chive to garnish.

Delicious dinner, eh?? and I made it all at home.  

Home made stuffed pasta


What this is is a combination of two different styles of stuffed pasta, Cappelletti and Tortelli. Both are amazing on their own in shape and size but I just love how the combination has come together, don't you?? These are stuffed with a four cheese bechamel sauce. The cheeses are Mascapone, Asiago, mozzarella, and Pecorino.

I'm sorry to say that when I made this dish I didn't write down the the measurements of all the ingredients that i used, but i can give you the guide lines and hope it help you out.

In a pot melt about 1/3 a cup of butter and toss in some garlic and thyme and cook until the garlic gets soft, then start to cook in flour until you have a nice thick roux, cook the roux until golden brown and then mix in your milk and cook until thick and you cant taste the flour, then use a hand blender to just blitz it all up. Now your ready to start mixing in your cheese. You can make a choice in how much you want to put in, whether it's a little or alot it should be fine. Once the bechamel has cooled down fill your pastry bag and tie off then place in fridge to chill and so it will become a little thicker. It's ready when it keeps it's form when you speeze it out onto a flat surface.

The pasta dough is much simpler.

6 egg yolks
2 cups of white flour
1 teaspoon of kosher salt

Place the flour on your pastry board and sprinkle the salt over it, use your fingers to create a well in the and place the egg yolks in. Now whisk them up without spilling them everywhere and start to mix them into the flour slowly. Once mixed in start to knead the dough, and keep kneading until it's nice and smooth.
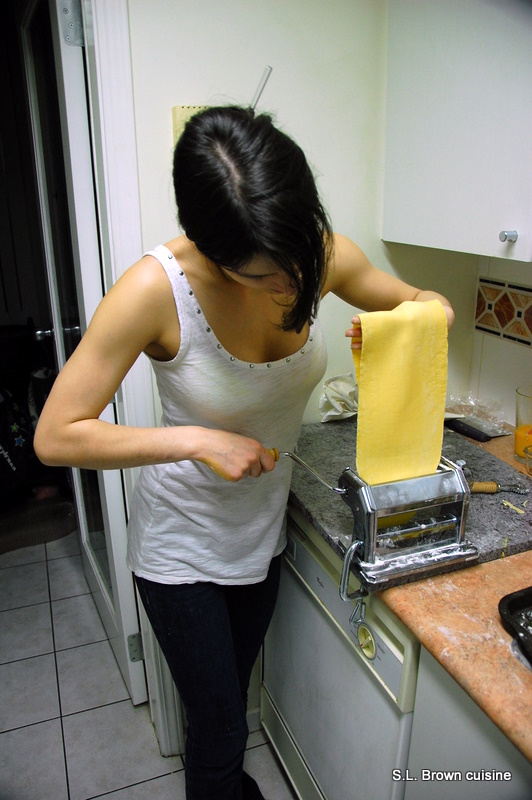
Now what you need to do is set up you pasta machine to roll it all out. and remember to roll it out one chunk at a time on a heavily floured machine or the dough might stick. Once it's all been rolled out take your filling out of the fridge and cut all the pasta sheets into the right size with a scalloped pasta cutter. Now place a large dollop of the filling in the middle of each sheet and brush the pasta with an egg wash so it will "glue" together and fold it over and press down. not that you have your "Tortelli" done it's time for that last fold. Sorry I didn't get a picture of it for you guys, but it's fairly simple, just take the two corners at the folded side and squeeze down on them hard to press them together. Now all you need to do is cook them for 6-8 minutes in a pot of salted boiling water.

The sauce is simple a delicious.
In a pot, tomatoes, basil, oregano, peppercorns. Cook until the tomatoes become soft, add some chicken stock and then take your hand blender to blitz it all up, then leave to simmer on the stove stirring every 5-6 minutes until you reach your preferred flavour.

The basil oil is easy, just put basil and olive oil in a blender and put it on high. the oil will be ready when there's steam coming off of it. Tape a coffee filter into a bowl and strain it that way.

now all you need to do is plate !!! and don't forget you reggiano to top everything !!!! 
You know, all this typing has made me hungry...so have a great day every one and have a great meal!!! I hope you have as much fun making this as I did, let me know how it turns out for you. This is your Chef De Cuisine say see ya.

Thursday, 19 May 2011

Pineapple Cherry stuffed Steel Head Trout


Hi everyone !!! Who`s as stocked about the Canucks as I am ? what an amazing game today, and to think I passed up free tickets to make dinner at home this evening. At at least dinner was well worth the sacrifice, I just wish my TV didn't glitch out on me right in the middle of second period.

What we`re looking at today is a Steel Head Trout stuffed with quinoa, pineapple and cherries, a fennel and dill salad dressed simply with lemon juice and olive oil all on a bed of pea shoots, lemon slices to garnish.

For Quinoa salad:
1/4 cup white Quinoa
1/3 cup finely chopped Pineapple
1/4 cup finely chopped cherries

The first thing you should do is rinse your quinoa, then set onto a medium-high heat with 1 part quinoa and 2 parts water ( just like rice), while the quinoa is cooking chop your pineapple and cherries up nice and small. When the quinoa is done cooking take off the heat and mix the fruit into the pot and set a side for later use.

Fennel salad and dressing:
1/2 teaspoon dijon
1/3 cup olive oil
1/4 cup lemon juice
salt 
about 1/2 cut of chopped fresh dill
1/2 fennel bulb

Just toss all of this in a bowl and whisk it up into a nice dressing. As for the fennel, I hope you have a japanese mandelon at home to slice it if not then i recommend getting one because it will be such a big help to you. Now all you want to do is slice this as thinly as possible and toss with your vinaigrette then set aside in the fridge to let in marinate until it's time to plate.

( This is a japanese mandelon )

For the Trout:
fillet knife
kitchen shears
Fabrication tweezers 
butchers twine

First you nee too preheat your oven to 400. 
It's simple once you have some practice but de-boning a trout is never fun. The first this you want to do is when your at the super market is make sure the fish has been gutted and de-scaled properly. Now too prepare it for stuffing you need to use the fillet knife to cut the rib bones away from the spine, and then slice the meat away from the spine as well.


Next take your shears and slowly snip the spine out


After you've removed the spine take your tweezers and remove all the tiny rib bones.

Now all you need to do is stuff and tie it up so that you wont lose all the filling.
Once it's stuffed and tied up season with salt and pepper while heating up your pan, use a generous amount of oil to cook the fish. First sear on one side until the skin is crispy and then flip gently. Once flipped sear for two minutes and place your 3 lemon slices on top of the fish then throw in the oven for 12-15 minutes. 

When you take the fish out of the oven place a small bed of pea shoots on the plate, and the Fennel salad on top of that, finishing with the Trout. I really hope everyone will give this a try, I just loved this dish to death and cant wait to make it again, but I'm going to have too because I have a lot of chicken in the fridge I need to do away with today and tomorrow...hmmmm maybe a chicken burger of some kind?? I'm open to suggestions if any of you know what i should have for lunch tomorrow then let me know !! For now I have a few things to take care of so this is Chef De Cuisine wishing you all a great day and great food !!


Wednesday, 18 May 2011

Paprika Chicken

Okay, so for the last couple days I've been giving my older brother a crash course in the culinary arts because he's considering going into the industry as well. Basically going over knife skills, basics on cook times, butchery, ect...

Today was focused on quartering ( butchering ) a chicken and how to make a proper vinaigrette. What you see is a paprika dusted chicken breast that has been freshly butchered, fennel and radish salad dressed with a orange dijon vinaigrette, and super tender wild rice. to garnish there is orange reduction and sweet pea shoots.

the preparation for this dish is:
wild rice
salad
vinaigrette
chicken 

 So with wild rice it's a lot different from regular rice in that it's not a 2:1 water to rice ratio, one cup of this stuff takes about 2- 2 1/2 litres of water (crazy eh?? ) and also take about 45 minutes to boil and cook until properly tender. You'll know it's done once it's kinda exploded like popcorn, and when you taste it it should still have a little bite left to it, but not too much other wise it'll just taste like sticks. Once you've cooked it properly, strain it and then mix in some salt and butter for flavour.

So as soon as you put your rice on to cook turn your oven on too 400 and lay both of your chicken breasts on a plate skin side up and season with salt and pepper, afterwards dust with paprika. Wait until you have 15 minutes left in the rices' cook time then heat up a pan to just past medium with some olive oil and place skin side of  the chicken down to get it crispy, sear it for two minutes then flip and sear for another two minutes. Now put it in the oven , pan and all, for 14 minutes, flipping them at the 7 minute point to cook it evenly. These will be ready when you can poke it and it's firm with only a slight bit of give.

Now for this part, do it after you season the chicken and before you put it in the oven. So that should give you about half an hour to get it ready.

Vinaigrette 
1 teaspoon of dijon mustard
1/4 cup blood orange vinegar
1/2 cup olive oil
salt&pepper

All you need to do is whisk this all together in the same bowl until it forms a solution and it's done, it should take 3 minutes or less.

For that actual salad, you just slice half of a fennel bulb and 4 radishes as thinly as possible and wait until the rice and chicken are done before you toss it with the vinaigrette. To garnish this dish just use a small bunch of pea shoots. 

For those of you who try this dish, I hope you enjoy it as much as we did !!!! this is Chef signing off and hoping you all have a great day with great food !

Sunday, 15 May 2011

an all appetizer dinner


Heyy !!! how is eveyone?? I've had a pretty epic day today, so what better way to  finish it off then with an epic dinner, am i right??

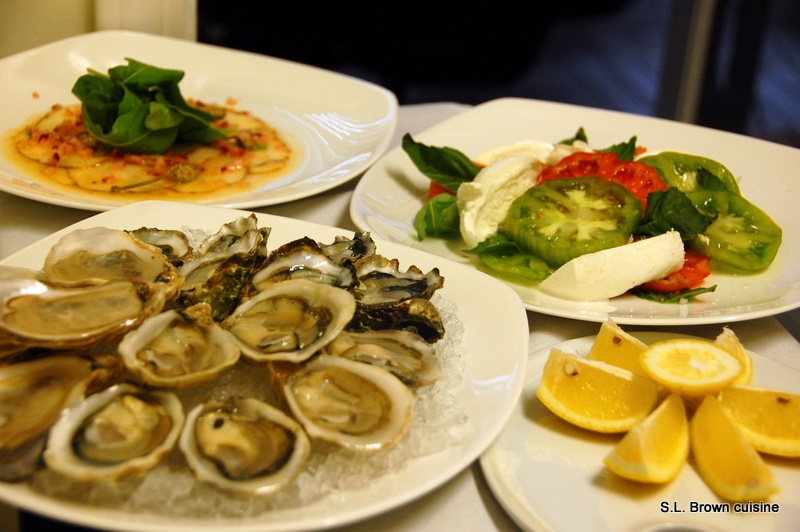
We decided to keep it simple tonights so Wwat you see here is oysters, a caprese salad, and a cured halibut carppaccio, all made right at home !! for oysters we have the classic kusshis' are very popular in vancouver because they're small and have a really clean flavor. Grown by Keith Reid, a oyster farmer in Deep Bay, "Kusshis are grown in floating trays and tumbled very aggressively. This breaks off the thin growing edge and forces them to deepen and thicken their shells. The resulting oyster, called a Kusshi, Japanese for “precious,” is almost as deep as it is long—just over two inches." 
The next oyster we had was kumamoto, grown in California. They are very well known for the appearance of their shells, which is dark and fluted. These are similar to kusshi in flavour, but a little bit more briny with almost a melon flavour after taste, larger ones are also very meaty at times.
The last one we had were Prince Edward Island Malpeque. This being one of Canadas' most consumed oyster, and one that is good both cooked and raw. This is one I would recommend to eat with a little bit of lemon juice, the meat has a very mild flavour and is also very tender. Easy to eat, easy to swallow. The brine is a little strong and on the pungent side, the combination of both flavours create a clean and delicious flavour!

Now we move on too one of my all time favourite salads, a traditional caprese salad with heirloom tomatoes, buffala mozerella and basil seasoned lightly with sea salt. Some what self explanatory so i wont spend too much time on it. What I can say on the subject is that if you can get your hands on some nice balsamic vinegar then keep some in a small bowl on the side for dipping your bites in.

Last but not least, the halibut carpaccio. This is a dish that i've been working on for a few months, and have finally perfected ( there will be a full recipe posted soon ).
Again very simple but not as simple as the others. I took a piece of halibut fillet and rubbed spices on it, then wraped it tightly with plastic wrap, then froze it, it needs to be frozen in order to be able to slice it as thinly as needed. After it's ready, slice thinly and place on plate, once on the plate it's time to cure it., in this recipe it's a spicy citrus cure. The garnishes are caper berries, diced rhubarb, and a small arugula salad, and last but not least you need some sea salt a la minute so it wont melt into the cure/sauce. This adds a necessary saltyness and texture that the dish wouldn't be complete without.

I hope you will take inspiration from any one of these dishes and enjoy you meal times as much as I do, this is Chef signing off and wishing you all great food !!!

Saturday, 14 May 2011

braised lamb shank


This is more of a winter/fall dish, but I thought I would share it anyway, hoping that all you guys will enjoy it !!!! Sorry to say that I didn't get any pictures of it, but next time I make it I'll be sure too

so go buy 2 lamb shanks to start.

 3 celery stalks 
2 carrot
1 piece pf lemon grass
1 onion
4 Cinnamon sticks
thyme and rosamary
hand full of pepper corns
2 cartons beef stock 
1 bottle red wine

Sear lamb on all sides until you have a nicely browned and put in the bottom of a deep pot, cut *mire poix (celery carrots and onion) into 1 inch pieces and put in pot, break lemon grass into 4 pieces and put in pot, put all remaining ingredients in pot and bring to a quick boil then place in 400 degree oven with lid on for 4-41/2 hours.


celery root purée,

3/4 litter homo milk
3/4 litter white wine  (try to get one with an apple-y flavour)
1 celery root
1 russet potato
1 small onion

Place milk and wine into a pot, chop the celery root. peeled potato, and onion into 1 cm cubes and put into pot bring to a boil and simmer for 20-25 minutes. Drain after and place in a food processor slowly adding butter until velvety smooth. Sever warm

when you remove the braised lamb from the oven fill a frying pan with the braising liquid and reduce down into a syrup, add butter for flavor. This will work as a nice sauce for the lamb. remove the lamb from the oven as soon as the celery root starts boiling to let it cool and start the sauce asap so its ready in time. If your milk curdles a little bit when it first starts cooking don't worry it's normal, it will smooth itself out.
The asparagus is simple, cut it in half length wise and saute in butter for 2 min.


Hat's off to those who try this at home ! and thank you for reading, have a good day !!!!